iPhone用サーバーアプリは ObjectiveResource + Ruby on Rails で超簡単!!
注意 現在ObjectiveResourceは iOS4.0 に対応できてないようです。 詳しくは こちら
iPhoneはゲームのようにiPhoneだけで完結するアプリもありますが、たいていのアプリはサーバーと連携することで大きな可能性を得る事ができると思います。 その際にサーバー側のシステムとiPhone側のサーバーとの通信をどうするかは悩みどころですが、ObjectiveResource + Ruby on Rails を使うと本当に簡単にサーバー側と通信を行う事が出来ます。
サーバー側は Ruby on Rails
ご存知のように、Ruby on Rails を使う事で高機能なWebサイトが短期間で構築できます。

例えば、上の画像のようなToDo を管理するようなWebアプリは 以下の様にコマンドを入力するだけで出来てしまいます。
% rails todo
% cd todo
% ./script/generate scaffold  todo due:datetime task:string
% rake db:migrate
% ./script/server
しかも、Rails は Webサービスとしての機能も持っています。XMLやJSONを使ってiPhoneとのデータのやり取りができます。
ObjectiveResource (iPhone側)
iPhoneにはURLを指定してサーバーからデータを取得したり、サーバーに送る API が用意されています。また、XMLのパーサーもあります。しかし、これらを組み合わせてサーバーとのやり取りを行うコードを書くのはそれなりに手間です。
その手間を無くしてくれるのが、 ObjectiveResource です。 ObjectiveResourceを使う Railsのモデルを操作する感じで簡単にサーバーとのやり取りが行えます。
モデルの定義
上のToDoアプリのモデル Todo には 日付 due と タスク task、レコードのid を メンバーを持っていますので Objective-Cで以下のようなモデルを定義します。
Todo.h
#import <Foundation/Foundation.h>
#import "ObjectiveResource.h"

@interface Todo : NSObject {
	NSString *todoId;
	NSDate   *due;
	NSString *task;
}

@property (nonatomic , retain) NSString	*todoId;
@property (nonatomic , retain) NSDate	*due;
@property (nonatomic , retain) NSString	*task;

@end
Todo.m
#import "Todo.h"

@implementation Todo

@synthesize todoId;
@synthesize due;
@synthesize task;

- (NSString *) description {
	return [NSString stringWithFormat:@"due:%@ task:%@", due, task];
}

- (void) dealloc
{
	[todoId release];
	[due release];
	[task release];
	[super dealloc];
}
@end
実装コード実質的には dealloc のみです。description はデバック等で便利なので書いてあります。
一覧表示
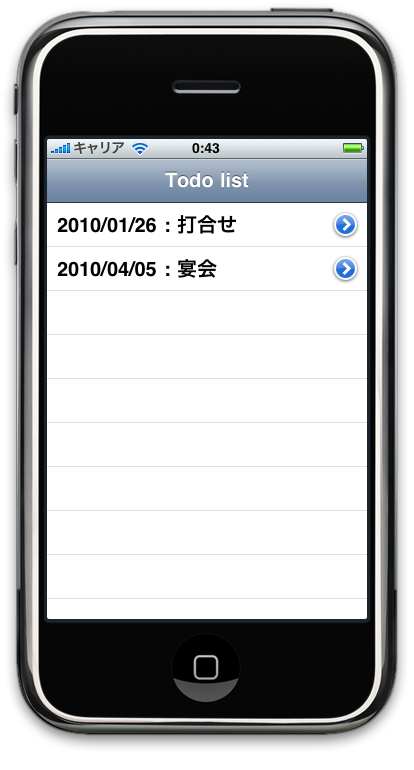
右の画像の様に、サーバーからToDoデータを取得し表示してみましょう。
コードは良くある UITableView 表示のコードで
ObjectiveResource と関連するのは下の3カ所だけです!
(1) はサーバーのURL指定。
(2) は Date型データを受け渡すさいのおまじない (何をしてるのかは後ほど書きます)
(3) は Todoデータの全件を取得し todos 配列に代入してます。
#import "TodoViewController.h"
#import "Todo.h"
#import "ObjectiveResourceDateFormatter.h"

@implementation TodoViewController

- (void)viewDidLoad {
	[ObjectiveResourceConfig setSite:@"http://localhost:3000/"]; //  -- (1)
	[ObjectiveResourceDateFormatter setSerializeFormat:DateTime]; //  --  (2)
        [super viewDidLoad];
}

- (void)viewWillAppear:(BOOL)animated {
	todos = [[Todo findAllRemote] retain]; // --- (3)
	[self.tableView reloadData];
	[super viewWillAppear:animated];
}

- (void) viewWillDisappear:(BOOL)animated {
	[todos release];
	[super viewWillDisappear:animated];
}

- (NSInteger)tableView:(UITableView *)tableView numberOfRowsInSection:(NSInteger)section {
    return [todos count];
}


- (UITableViewCell *)tableView:(UITableView *)aTableView cellForRowAtIndexPath:(NSIndexPath *)indexPath {

	static NSString *CellIdentifier = @"Todo";

	UITableViewCell *cell = [aTableView dequeueReusableCellWithIdentifier:CellIdentifier];
	if (cell == nil) {
		cell = [[[UITableViewCell alloc] initWithFrame:CGRectZero reuseIdentifier:CellIdentifier] autorelease];
	}

	NSDateFormatter *dateFormat = [[[NSDateFormatter alloc] init] autorelease];
	[dateFormat setDateFormat:@"yyyy/MM/dd"];

	Todo *todo = [todos objectAtIndex:indexPath.row];
	cell.textLabel.text = [NSString stringWithFormat:@"%@ : %@",
						   [dateFormat stringFromDate:todo.due],
						   todo.task];
	cell.accessoryType = UITableViewCellAccessoryDetailDisclosureButton;
	return cell;
}

- (void)tableView:(UITableView *)tableView accessoryButtonTappedForRowWithIndexPath:(NSIndexPath *)indexPath {
	editViewController.todo = [todos objectAtIndex:indexPath.row];
	[self.navigationController pushViewController:editViewController animated: YES];
}

- (NSIndexPath *)tableView:(UITableView *)tableView willSelectRowAtIndexPath:(NSIndexPath *)indexPath {
	return nil;
}

・・・・

@end
変更画面
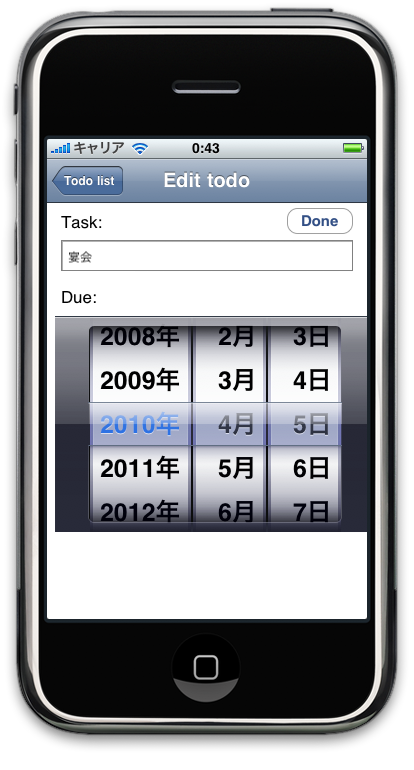
右の画像の様に、ToDoデータを変更しサーバーに戻すコードですが、やはりObjectiveResource と関連するのは下の3カ所だけです!
(1) DatePickerから日付を モデル todo に代入
(2) TextFieldからタスクを モデル todo に代入
(3) (1),(2) の値をサーバー側に送る
#import "TodoEditController.h"

@implementation TodoEditController

@synthesize todo;

- (void)viewWillAppear:(BOOL)animated {
	dueDatePicker.date = todo.due;
	taskTextField.text = todo.task;
	[super viewWillAppear:animated];
}

- (IBAction)onPushEditDone:(id)sender {
	todo.due = dueDatePicker.date;   // --  (1)
	todo.task = taskTextField.text;    // --  (2)
	[todo updateRemote];	         // --  (3)
	[self.navigationController popViewControllerAnimated:YES];
}

- (BOOL)textFieldShouldReturn:(UITextField *)textField {
	[textField resignFirstResponder];
	return YES;
}


・・・・

@end
超かんたんでしょ!

